We likely all know what Meals Ready to Eat, or MREs are. Just in case you are unfamiliar with the term, MREs are those handy, single meals packed up in a sturdy plastic pouch that are issued to troops for eating in the field, or used in disaster relief or emergency preparation.
However, if the modern MRE is the pinnacle of military ration technology, that also means it represents the peak of ration evolution. As part of the ongoing quest to provide easily transported, stable, nourishing and quick to prepare food, the MRE is truly a modern technological marvel. It is also somewhat expensive to purchase and store, and of course limited in contents. The individual user has no choice of what menu items are in a case, and the high cost of purchasing new production MREs leaves a lot of folks asking “how can we make meals ready to eat, ourselves?”

The USDA tests MRE’s for purity. (Courtesy of National Archives and Records Administration)
Well, the answer is somewhat complicated. Unless you have access to an industrial grade food packing plant, you aren’t really going to be making a modern United States Military style MRE. The specially formulated food packed in thermostabilized retort pouches requires not only careful engineering of the food, but also special packing equipment that just isn’t within reach of the average prepper.
Yes, you can pack some shelf stable food in home vacuum sealing equipment, but you are limited in what you can store without refrigeration and in variable climate conditions. However, it is still possible to make homemade MRE’ if you are willing to both look a little further back in time, and also take a lesson from our European allies.
C Rations – With a Twist
The very invention of modern canning is rooted in the need for improved military rations. Since 1809, armies have made use of canned food to feed soldiers. During WWII, the famous K-Ration made great use of canned food, along with various off the shelf products such as soluble coffee, candies, and commercial crackers.
The K-Ration eventually evolved into the C-Ration that some readers may remember with varying levels of fondness, and built on the idea of a canned main ration, and other commercial or mass produced foodstuffs packed to form a complete meal.
Many European nations choose to issue 24-hour ration packs, which is what I am drawing inspiration from. Again, using a large amount of commercially available products, these ration packs offer a comprehensive feeding solution that is both easy to prepare, and easy to assemble into a meal kit.
Assembling a Homemade MRE
Sadly, we have to do do without those nifty thermostabilized pouches. If you are buying food like that, you might as well buy complete MRE’s, and they really just can’t be made at home. What we are putting together is more like the ultimate C-Ration combined with a few odd twists. Let’s start with a few simple concepts.

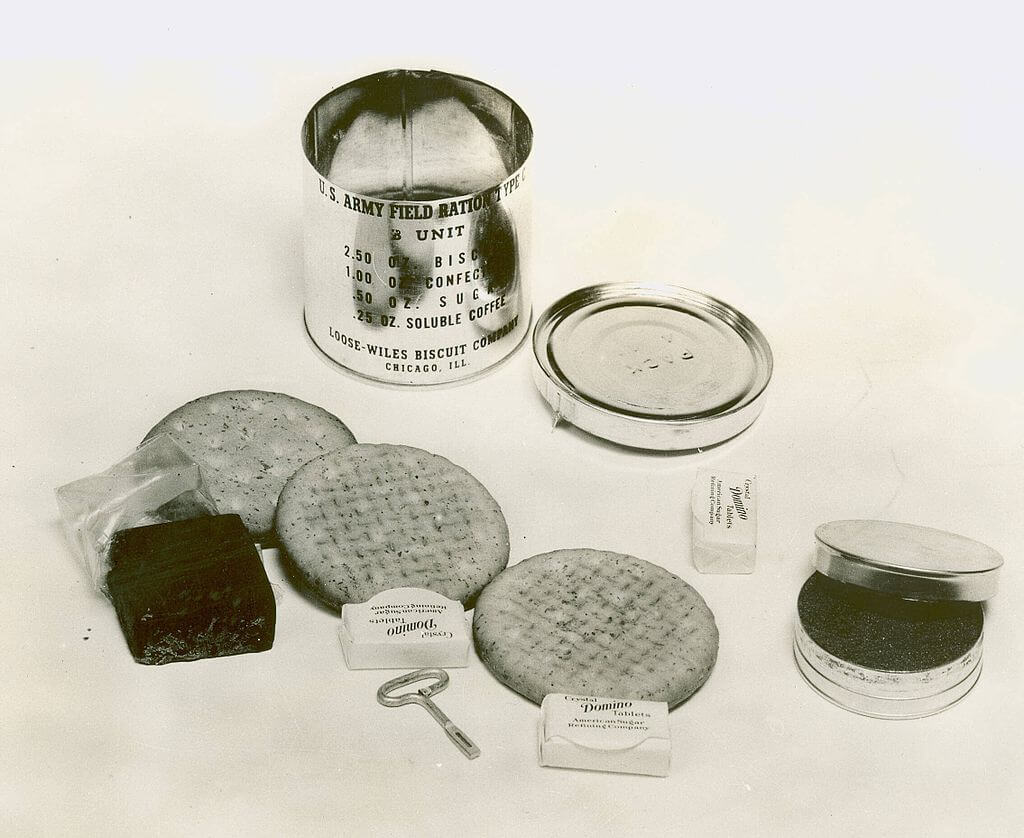
WWII Era C-Ration accessory kit with crackers and instant coffee. (Courtesy US Army and Wikipedia)
A Homemade MRE should deliver the following:
1200-1400 Calories Per Meal
In a survival situation you will need to consume huge amounts of calories. If you are fortunate enough to not have to work hard, you’ll have leftovers and can stretch your food further. Just like ammo, nobody ever complained about possessing too much shelf stable food during an emergency.
Edible Without Heating or Preparation
This might not mean tasty, but cold food is better than no food.
Satisfying
Even if we allow for the times you might not be able to heat your food, some or all of your meal should be pleasant to eat. A survival situation is no time to be miserable. Include treats, foods you enjoy, or that are meant to be eaten cold.
Healthy
A homemade MRE should be nourishing and capable of sustaining health for long periods of time.
Easily Portable
This means a mix of foodstuffs that do not burden down the prepper at home or in the field.
Meal Planning
Questions to ask yourself before embarking on a DIY MRE quest:
- What do you like to eat for breakfast?
- What do you like to eat for lunch?
- What do you like to eat for dinner?
- What sort of snacks do you like?
- What do you like to drink?
- Do you have dietary restrictions for religious, cultural or health reasons?
- Now ask yourself, what cooking facilities do you have at your disposal?
- What can you take with you in an emergency? Some sort of portable stove and mess kit, I hope?
The answers to each of these questions helps refine how you make your homemade MREs.
As indicated earlier, you want to allow for about 1,200 or so calories per meal, or less if you know for a fact you will be using them in a setting where you are not exerting more energy than usual. Only you know what your daily calorie needs would be under various survival circumstances. This means you have a lot of freedom to adjust the calorie content up or down as you need based on how you plan to use these homemade MREs.
Each meal should contain a main item or entree, some sort of instant (or ready to drink if you like) beverage, a carbohydrate if your diet allows for it, some form of quick energy food, and maybe a snack or treat as you might favor. Your entrees should be protein rich, and be consumable hot or cold.
Entree Ideas
- SPAM or canned corned beef, or other canned meats.
- Hearty soups or stews
- Canned chili.
- Jerky (jerky can also be prepared and packaged at home using a vacuum sealer.)
Carbohydrate Ideas
- Sleeves of commercially prepared crackers (you may want to wrap these in an additional layer of plastic, and be mindful of the best by date.)
- Commercially prepared pilot bread
- MRE crackers (readily available in bulk.)
- Homemade hardtack.
- Prepared rice or pasta side dishes which are commonly sold in retort pouches.

Hardtack is as useful today as it was during the Civil War. (Courtesy National Parks Service)
Snacks, Sides and Accessories
By now we can figure out some great ideas for your main meal components. But what about filling out the rest? Your side dishes and snacks can fulfill the remaining calorie and operational requirements of a homemade MRE. I like to work with the following items, some of which will require hot or boiling water. In some cases too, the clever prepper can repackage bulk quantities of things like beverage powders or instant coffee to save money.
- Instant noodle cups or Ramen packages.
- Instant soup packets (like chicken noodle or french onion soup.)
- Instant coffee or hot chocolate packages.
- Powdered sports drink mix.
- Tea bags.
- Hard candies (candies made without fat have a nearly indefinite shelf life.)
- Gum, chocolate, or other commercially prepared candies.
- Dried fruits and/or nuts.
- Energy/protein bars.
- Single serving soup cups.

Single serve snack items are an important part of a homemade MRE.
You’ll need to consider things like your accessories as well, when making DIY MREs. Will you always have a basic mess kit, or should you stick some plastic cutlery in there? Commercially available MRE style flameless food heaters can be purchased, and they work surprisingly well with some canned foods, or you can buy inexpensive almost disposable metal stoves that use solid fuel tablets or alcohol fuel gel.
I’ll repeat this, but don’t forget a can opener! Classic P-38 can openers can be had cheap, and they are also easy to carry on your person and keep in your survival kit. In fact you should have redundant ones. Even pull tap canned goods can sometimes fail, requiring the intervention of a can opener.
Also include the following:
- Toilet paper.
- Paper towels/napkins.
- Hand sanitizing wipes.
- Matches.
- Digestive aids.
- Cutlery.
- Fuel tablets or gel.
- Folding metal stove.
- Spices and seasonings.
- Hot sauce.
- Sugar and creamer.
- A CAN OPENER!
One thing that I always think preppers and survivors fall short on, is actually making their emergency food tasty and pleasant to eat. If you are dipping into your food stores, it is exactly the moment you don’t want to be eating bland or boring food. When making up your homemade MREs, don’t forget the little things that make food worth enjoying.
Using Freeze Dried Foods and Other Thoughts
If you are willing to allow for the regular use of boiling water, you can expand your homemade MRE concept to include any of the unbelievable array of freeze dried foods and entrees. However, freeze dried food is expensive. So you might want to skimp on the use, unless you buy in huge bulk quantities and can repackage them.
Old United States Military rations used to include things like cigarettes. Today, we are well aware of the health risks of smoking, but many of us do it anyway to one degree or another. If you are a regular tobacco user, it probably won’t hurt to include a small amount of your favorite vice in your homemade MRE. You may also want to consider adding a tiny amount of alcohol. A mini airline sized “shooter” bottle of distilled spirits won’t get you intoxicated, but it can provide a pleasant glow and experience after a meal, and help maintain morale.
Conclusion
Making a homemade MRE isn’t that difficult. By taking hints from American history, and the current methods of many European armed forces we can assemble a never ending variety of homemade MREs. You will quickly see that there is room for homemade components that can be safely stored in vacuum sealed bags for a year or more. There are also a huge array of commercial products that can be used, ranging from traditional canned goods, to modern side dishes and snacks prepared in various reheatable containers. Simply walking through any decent grocery store will give you enough products and ideas to pack away as many homemade MREs as you might like.
With legal, fresh production MREs running $75 or more per case of 12, there is little reason to be spending over $6 each on MREs. Of course the utter convenience of real MRE’s is hard to beat. But unless you are operating in the kind of settings that make the compact nature of MREs invaluable, you can dial it back a bit. And the fact that so many nations around the world still use canned and off the shelf goods in their military rations proves the utility of that concept.
Homemade MREs give you more flexibility, and cost savings over buying ready made MREs. They allow you to add things you can prepare at home, tailor each meal to your needs and tastes, and save you money. It is unlikely that no two people will ever prepare homemade MREs the same way, and really, that is ok!


